
People still break spears and raise toasts over the Flambient method. I’m going to explain why it’s time to walk away from Flambient — and why that’s entirely possible today. To understand what’s going on, you have to grasp where this method came from. From there, we’ll figure out where and why to move forward — with gratitude to Nathan Cool and his era, but with clear eyes on our own goals today. This article is also available in Russian. I’ll also show 6 examples (1, 2, 3, 4, 5, 6).
📌 What Flambient Is and Where It Came From
How the Method Was Born in the U.S. Real Estate Market
Flambient was born in the American low-end real estate market, where a photographer needs to shoot 2–5 homes a day just to stay in the game. There’s no time left for editing, let’s be clear. The properties are fairly standard — nothing like the architectural variety you’d find elsewhere. The system needed a mechanism. Nathan Cool delivered one.


K. TOLL | Example 1 2, 3, 4, 5, 6 | N. COOL
 As an interior photographer, I look for a balance between speed and final image quality. I recently decided to run an experiment using photographer Nathan Cool’s workflow as a starting point. I compared his Flambient method with my own approach to manual post-processing. Here is that journey through the lens of three frames:
- Frame 1: The original file from the shoot. This is the clean raw frame Nathan captured on location. Let’s be honest: the original is frankly bad — I pulled it from a video screen. We can see a real mess here.
- Frame 2: Nathan Cool’s result (Flambient). Nathan fixes the situation using his usual method. Yes, the image has become cleaner. In my view, the space has become flat, sterile, and plastic — like something from a cheap catalog.
- Frame 3: My final result. I took a different path. Working entirely by hand, I assembled the frame using luminosity masks, carefully dosing the light streams, while removing all parasitic reflections and technical grime with generative fill. I honestly don’t understand what stops Nathan from using these modern tools.
Asian Outsourcing as a Survival Strategy
Nighttime in the U.S. is the workday in India and Vietnam. The American photographer uploads RAW files to servers run by Asian editing companies. While the U.S. sleeps, dozens of retouchers trained on Flambient manuals crank out photo-hamburgers in Photoshop: assembling bracketed exposures, cleaning up window frames, pasting in view posters.
The Checklist-Driven Flambient Result
Retouchers in Asia follow a checklist, and Cool’s method fits perfectly: make the ceilings white, blend the flash-into-ceiling shots, paste in the window view via Darken mode (more on that below). Pure automated machinery on an assembly line.
The photographer-operator spends time only on driving between houses and pressing the shutter and firing the flash according to instructions. The scheme doesn’t even attempt to highlight a property’s advantages or unique character. The timeline won’t allow it (see below). The entire hope rests on a home stager doing good work before the photographer arrives.
© «Differentiate or Die.» Lost profit is when a property is sold «like everyone else’s» — faceless and characterless. Especially in the tough market of 2024–2027.
☛ «One method does not make a photographer.» If a photographer only has one method, they’re not a photographer. They’re a robot-puller with a button and a flash. Professionalism means understanding strategy and commanding a wide range of techniques combined with creative synthesis — not robotic obedience to a manual.
📌 How Much You Earn With Flambient, Without It, and Where the Trap Lies
▶ Shooting for the Realtor Pipeline. A Flambient shooter spends about one hour per house on an average package. After 3–4 houses in a day, the human body is finished. Subtract $20–40 per property for retouchers at roughly $0.80 to $1.50 per Flambient-method photo, subtract $50 for gas, parking, and similar expenses. Then take out taxes. More on those below.
Three Basic Packages
- Small Package: $150–200 for 15–25 shots: for apartments and condominiums.
- Medium Package: $200–350 for 25–40 shots: for a standard 3–4 bedroom suburban home.
- Large Package: $350–500 for 40–50+ shots: for homes over 300 square meters.
Add-On Services That Raise the Price
- Gray sky replacement with sunny sky: +$0.50 per photo.
- Object removal (cars from the driveway, hoses on the lawn): +$1–3 per photo.
- Virtual staging (placing 3D furniture in an empty room): $15–25 per finished angle.
Total: 3–4 houses a day ≈ $800–1000 gross.
About Taxes From Start to Finish
There’s no special license for interior photographers in the U.S., and the total tax burden on net profit averages 20% to 35% depending on the state. The difference lies in local laws: in «cheap» states like Texas or Florida, state tax is 0%, and business registration costs $50–300 with zero annual renewal. In «expensive» states like California or New York, taxes are higher, and the right to own a company costs at least $800 per year or up to $1,000 just for mandatory newspaper publication at launch.
▶ Shooting for Architects and Designers: Assembly-line photographers aren’t let in here. Thoughtful, grounded people work in this space. Everything revolves around natural light, realism, and manual color work. Photo count: 12–30 carefully crafted shots. Rate: roughly $700–1500+ per shoot. Architectural photography for designers: $1,500 to $3,500+ per shooting day plus separate licensing fees.
Additional Possibilities in Premium
- Drone aerials: +$100–150 for 5–10 aerial shots.
- Twilight shots: +$50–150.
- Matterport 3D tour: +$150–250.
- Reel/Tour video walkthrough: +$200–400.
Comparing an Assembly-Line Day vs. a Premium Day
At first glance, the numbers look close: the assembly line yields about $800–1000 gross per day, while premium yields $1,000. But once you calculate hidden costs, net profit, and time spent, the illusions shatter.
▶ On the assembly line: you spend about 4 hours shooting plus 4–5 hours driving between 4 houses. Your workday is 9 hours on your feet and behind the wheel. You’re squeezed dry as a lemon. The next morning, you have to check 140 frames from the outsourced team, find blending defects, and send them to realtors. Net profit: $810.
▶ In premium: the photographer spends 3 hours shooting and about 1 hour driving. At home, they thoughtfully and calmly retouch 15–20 frames. Even if that takes 6–7 hours, the workday is the same 9–10 hours, but in an entirely different format. Net profit: $990.
The Trap: Career Dead End on the Assembly Line
Shooting 10 houses in a day is impossible — there isn’t enough daylight or stamina. Scaling requires hiring runners, but then you stop being the author. If you don’t want that, there are three paths. The first two aren’t easy to enter. The ticket isn’t cheap.
Three Paths
Path 1. Luxury Segment: Architecture and Interiors. Clients are designers, architects, premium magazines. One project takes 2–3 days. Check: $1,500–5,000 per day plus licensing. Nobody gets in here with a portfolio of realtor listings.
Path 2. Commercial Production: Horeca & Retail. Hotels, restaurants, flagship boutiques. You’re the author, but with a team. Budgets reach tens of thousands. You need reputation and connections here.
Path 3. Shift Into a High-Ticket Business. If you swap photography for management, do it in segments with higher margins than the assembly line: CGI and virtual staging for developers, or a premium media agency for elite brokers.
Premium Grows in Value, Assembly Line Devalues
Today, a photographer shoots a house for $1,000. Tomorrow, a top architect sees their portfolio and orders a hotel shoot at $3,000 per day. The skill of working with the meaning of a space scales in price, while assembly-line «flash-blasting» skills devalue because they’ll be eaten by the evolution of iPhone automation and AI.
Of course, it’s worth noting that at a high price level, hiring a retoucher sometimes makes sense. But that will be a master, not a file-blending «worker.»


 Frame 1: The original screenshot from N. Cool’s video — the starting point.
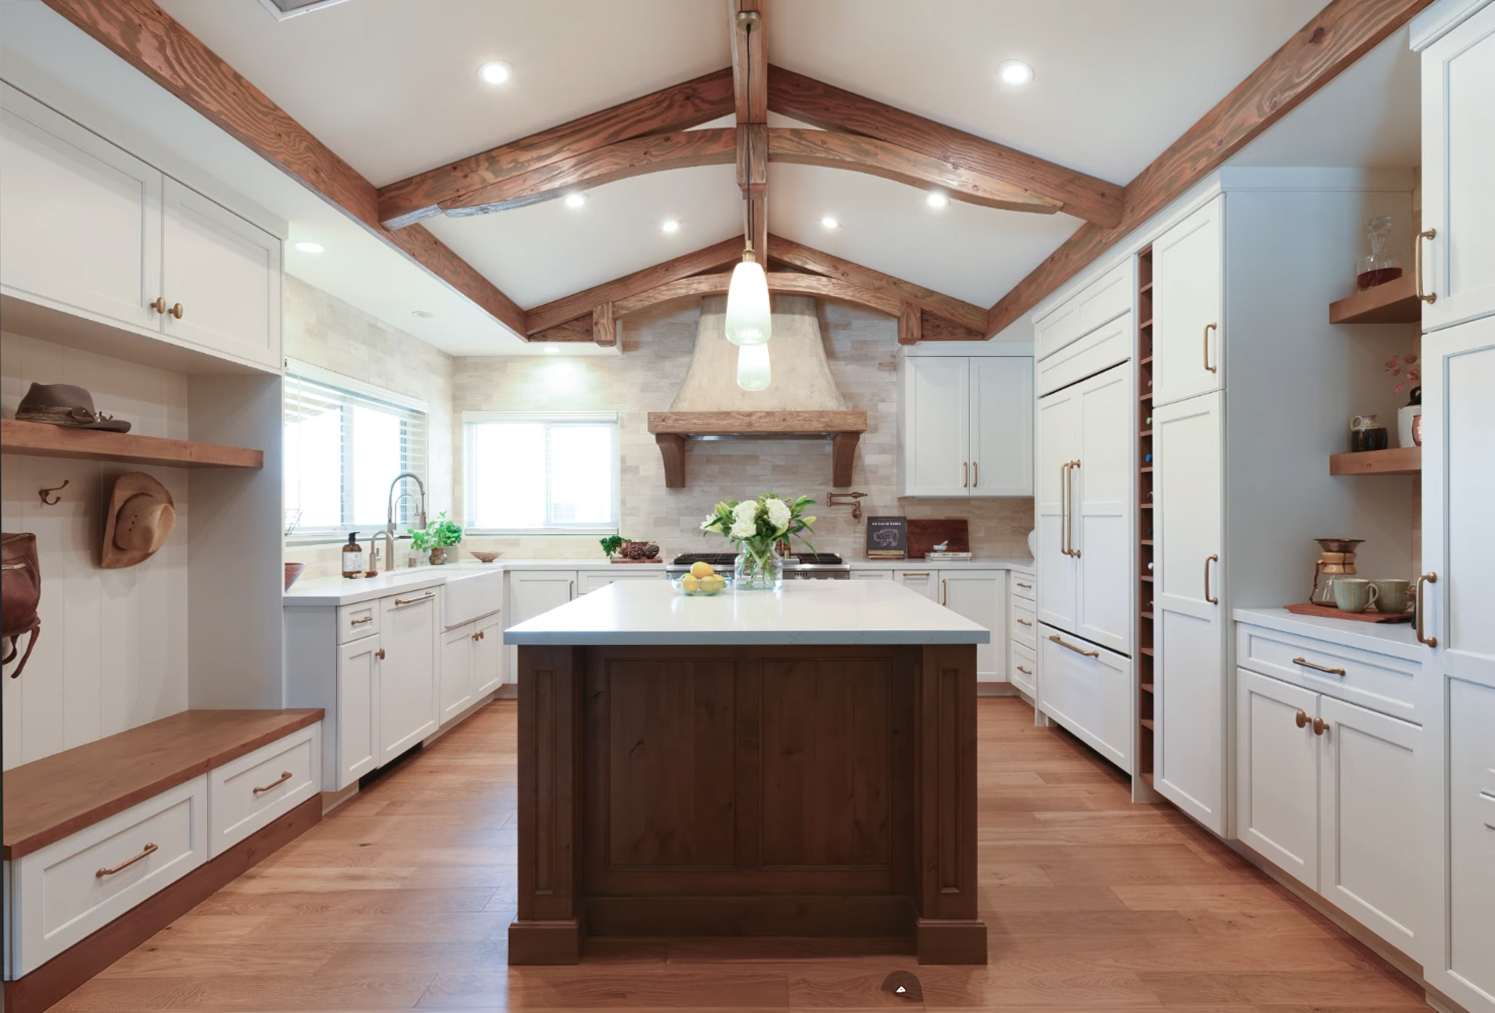
Frame 3: The heavy artillery from Nathan Cool. The flashes killed all the soul of the kitchen. The walls shifted into a cold, almost sterile office spectrum. And those mountains outside the window? Nathan wanted to show the landscape and turned the windows into unnatural objects, arguing with the light and compositionally unanchored. The landscape could have been captured as a separate frame. Even through the window. You just have to think during the process.
Frame 2: My result. I preserved the original light pattern and refined it with «smart» tools: I cleaned out the parasitic color casts. I locally lifted the shadows, and treated the windows with AI — they glow softly, as they should in real life on a sunny morning. To breathe life into the frame, I added generative staging (a bag on the bench and morning coffee).
📌 Why Flambient Worked Before — and Doesn’t Work Now
In his time, Nathan Cool cleverly bypassed the limitations of old camera technology. He handed a brilliant crutch for the U.S. real estate market to anyone eager to earn a buck.
A universal soldier for fighting «light vinaigrette» — that’s what Flambient is. Picture the typical scene: daylight punches through a window, sickly yellow halogens glow from wall sconces, and dirty green reflections from grass outside lie on the white ceiling along with magenta carpeting — or worse, purple. All this light soup mixes into hideous parasitic color casts.
Old cameras were bad «in the shadows.» Even 10–12 years ago, sensors couldn’t simultaneously see deep corner shadows and bright window sunlight. When assembling bracketed exposures, shadows got noisy and colors often dissolved into banding. A flash fired into the white ceiling was one workaround.
The specifics of Flambient. However, the method’s universality demanded foolproofing. In other words, Nathan Cool designed his method for houses with white ceilings and window blinds so that any trained donkey could replicate it. And Cool genuinely came up with a clever move: we’ll just remake all the light. Flash out the entire space. The image became bright. But the real lighting in the room was destroyed. And any owner of a camera, tripod, and flash could do it.
HDR blending algorithms were weak back then. The software of that era couldn’t cleanly assemble exposure brackets. And the files cameras produced were mediocre, as we already noted. So the flash-based answer suited the market. Although I personally never leaned that way back then, preferring to make complex masks (see «Light Surgery«) and building my technique in a different direction.
What Changed and Why
Purely technological solutions don’t live long. For the market that Flambient was created to serve, an iPhone already does a decent job. And computational photography technology is breathing down our necks. While Cool is still selling his books, let’s look at what his method does to real interiors.
📌 Where Cool’s Method Breaks Down Technically
There isn’t always a wall or a white ceiling. In long corridors, lofts with dark concrete ceilings, and double-height rooms, there’s simply nowhere to fire the flash. If you bounce a flash off a ceiling or wall with even a slight tint — beige, yellowish, green — the light comes back already colored by that tint. And for every case, Nathan creates a crutch. One method for a small room, another for a long one, a flash attachment for dark ceilings.
The Spherical Madness of Globe Softboxes
After realizing a bare flash fails on complex properties, Cool’s followers started mounting round globe softboxes that fire light 360 degrees onto their speedlights. The globe generates uncontrollable bounce reflections and glares horribly on glossy surfaces and glass.
Professionalism Means Understanding Overall Strategy and Tactical Moves
A true professional must command the entire list of techniques and construct their actual workflow from them in the process. Periodically, we step beyond the boundaries of known techniques — that’s professionalism, not just skill.
☛ «Cool’s method steals a professional’s main resource — attention.»
A professional’s attention should be directed toward composition, light, and finding the specific solution for the task at hand. We think through the real light in a specific room, search for the space’s standout feature for the given presentation, and figure out how to reveal that facet of appeal. And we don’t start with flashes. That’s one of the last-resort methods.
Flambient redirects our conscious energy onto machinery: where to fire the flash, at what power. The photographer stops seeing the interior; they only see the process. It’s not working with the subject; it’s simulating professional activity.
Better to think first. Then work — rather than doing habitual somersaults and cartwheels on the spot. Although that feels calmer and looks no worse than a circus act.


Original | Example ( 1, 2, 3, 4, 5, 6 ) | Final
Note. A shoot of a cabinet for a furniture supplier, done without additional lighting, capturing the atmosphere of the office on the day of handover, 15 minutes before employees moved in. Light touches distinguish raw clay from a jug, and a file from a photograph.
📌 Why the Flambient Image Looks Cheap. Today.
Everything changes. An image produced by Cool’s method looks more like a cheap 3D visualization from a decade ago. But while modern 3D graphics long ago learned to account for the direction of light sources and build honest shadows and reflections, Flambient photography is a step backward even compared to rendering.
Visual pressure on the viewer has grown enormously over these past 10 years. More and more, we hear that unnaturalness irritates the viewer. This is an important trend.
Interior photography works if — and as long as — the viewer believes in the image. In a real interior, light has a clear direction and character. Daylight from windows would produce one kind of picture, with soft lateral gradients. Evening electric light would produce another, with cozy local accents.
But then Cool’s method kicks in. By turning the ceiling into a giant softbox to develop the room, Flambient commits light fraud. Light starts pressing unnaturally from top to bottom across the entire space. Under every cabinet, table, protruding countertop edge, and shelf, horizontal shadows are carved out — shadows that physically cannot exist under natural light. The lighting scenario is broken.
Ten years ago, this didn’t yet grate on people. It was even fun and fresh. But now it’s no longer fresh and no longer sets a property apart with «color purity and a clean ceiling.» Today, you have to work at a new level — if not for art’s sake, then for effectiveness.
Consider an Example: A 30-Square-Meter Room With Five Windows
We have a rectangular room measuring 30 square meters with standard 9-foot U.S. ceilings. Three large windows on a side wall, two on the front wall. Five windows total.
Nathan’s Solution — and My Commentary on His Honest Wounds
Nathan Cool would break down this 30-meter room with 5 windows into mechanical layers. His goal: to fully subjugate the light, destroying all automatic camera algorithms in favor of the automatic algorithms of a living retoucher-robot in Asia.
On location, he would shoot 5–6 frames:
- 1 × Single Ambient (no flash): exposed strictly for the center of the room at base ISO, solely for the matte texture of the 9-foot ceiling. Corners are crushed to black; windows are blown out.
- 2–3 × Flash Frames Inside the Room: Cool physically steps into the frame. He fires one «pop» behind his back from the tripod for the foreground, then walks deeper toward the front windows and blasts the ceiling there to flood the far corners with light.
- 2 × Window Pulls: he approaches the side and front window groups up close, stops down to f/8, sets the flash to full power, and «punches through» the frames to restore the outside view.
A retoucher manually stitches this mosaic: erases Cool’s figure, masks the white spots on the ceiling from the flash frames, reveals the matte ceiling from the first frame, and rigidly pastes the window views into the empty frames via Darken mode.
☛ Flambient is capitulation in the face of complex light. When conditions are unfavorable, the method proposes drowning everything in flash and annihilating the problem along with the atmosphere. It’s a refusal to work with reality. For sport, it’s interesting to try a couple of times — sure, out of curiosity. But spending years in Flambient? That’s something else…
Criticism of Cool’s Method From a 2026 Reality
Today, Cool’s approach looks like assembling a Swiss watch with an axe. Technology has surged ahead, and the tastes of buyers and realtors have shifted radically.
▶ Cool avoids bracketing, and HDR from the 2010s with its «dirty» colors was indeed bad. But in 2026, modern camera sensors have insane dynamic range. Today, Lightroom and AI plugins stitch 3 bracketed frames in a second. We’re now fighting for a different level of image, and running around a 30-meter room with a monopod, generating 6 files where software creates a perfect base from 3 bracketed shots, is a pure waste of life and money.
▶ Conflict with retouching economics. Cool forces the photographer to shoot a pile of extra frames («light painting») and offloads the manual assembly onto an Asian retoucher. But on a real estate assembly line, nobody pays $10 per frame. For $0.50–$1.50, a Vietnamese freelancer can’t jeweler-solve every task for that low rate — chandeliers, furniture legs, spots, and halos. Torn, dirty color on dark profiles and window frames is also common. Pay little? Get little. Meat costs money.
As a result, manual Flambient on an assembly line often looks dirty: white halos appear around furniture (masking errors), the geometry of light spots breaks down, and about those poster-windows instead of breathing openings, one can only stay sadly silent. Automatic HDR bracketing now assembles shadow gradients in the corners of a long room significantly smoother and cleaner.
▶ Aesthetic shift. Cool’s main conceptual weakness is the final image. His method creates a commercially aggressive, «oversaturated» shot. Flash reflected off walls burns out the natural atmosphere.
- What people want now: The trend is the High-End Editorial Look (Architectural Digest aesthetics). Buyers in the U.S. are tired of plastic-looking, artificially brightened images. They want to see soft, diffused daylight streaming in from those very 5 windows.
- Cool’s method makes the image flat, like an operating room. The modern approach (HDR base + careful Flash-Assist only for windows and fabric saturation) preserves the deep, «expensive» penumbras from five windows, making the room feel cozy and dimensional rather than resembling a 3D render.


Original | Example ( 1, 2, 3, 4, 5, 6 ) | Final
Note. A photo package from the Yakor Business Center, due for delivery to the client shortly and readily at hand — I’m using it as an example of routine work. Here I did resort to flash for the sake of the distant chairs. And this is not advertising photography for a presentation, but it is a realistic image of the completed project. Of course, it is far from reportage. It is difficult, fast, and never typical work. I shoot a lot of furniture in office interiors.
🏆 How Is This Task Solved Today?
The photographer shoots 2–4 bracketed frames (they provide a perfect, soft, naturally lit base of the room and a pristine ceiling), possibly takes a shot with a polarizing filter to reduce glare + 1 or 2 quick flash frames exclusively for window zones, color contribution, and perhaps a touch of brightness.
Yes, it’s harder to create a «manual» here because the set of shots can differ for every interior. And although a remote retoucher at a low rate would still have an easier time with this than with Cool’s method, it’s still better to do the work yourself.
We should do our own retouching. And it’s not hard labor; it’s the creative work for which we exist — artists, not flash-button-pushers.
The resulting image is deep, alive, and sells the «atmosphere of the home.» And it now depends on your vision of the house. On your understanding of beauty and your ability to play with it.
Conclusions Before the Liberation From Flambient
- Visual fraud, not light work. Flambient is a cheap foundation cream on dirty skin. It doesn’t solve the light problem in an interior; it masks it. A professional doesn’t hide defects behind a flash pulse — they replace toxic bulbs and tune localized light. The method doesn’t correct reality; it swaps it for a surrogate. And when the surrogate betrays itself with torn grime on dark profiles and poster-windows, it becomes clear: this isn’t economy — it’s defect.
- A mental prison for the photographer. The skill of «flash-blending porridge» is a trap. With it, you can’t transition to the top league because the high-paying segment doesn’t buy the ability to flood everything with flash; it buys the ability to see beauty and meaning. You’ll remain forever a craftsman who masks ugliness. A method created for survival on the assembly line becomes a ceiling you’ll never break through.
- A chess game instead of capitulation. When light is complex, Flambient proposes capitulation: crush everything with flash and destroy the atmosphere. A professional plays chess with the space: shifts half a meter, catches the cloud softening the sun, uses a deep shadow as a compositional element. It’s not a fight with reality; it’s a game on its field. But the cost of this engagement is high: you must simultaneously see the shot, predict the light, and keep post-production in mind. The Flambient photographer has already spent that attention resource on the Flambient religion.
- Tactical realism instead of fake. When the perfect plan collapses — property ready Wednesday at 2pm, north-facing windows, no reshoot possible — Cool’s method masquerades as salvation: «Forget the light, I’ll flood it with flash and deliver.» That’s false rescue. A professional searches for micro-light in a gray courtyard well, turns on a floor lamp as an atmospheric anchor, works with color temperature in post. They deliver reality, not a fake that will disappoint the buyer who arrives and sees everything with their own eyes.
- The myth of independence from conditions. Flambient promises freedom from time and place, but the price of this freedom is the destruction of the space’s essence. True professionalism is the ability to see coziness in a simple home and play on your own field rather than overturning the board when the game gets tough. The perfect plan won’t exist, but you still play. Or you’re a «slave to the lamp.»
- A different rhythm, different optics. One thoughtful shoot per day is optimal. Two fast properties, maximum. Processing is strictly personal and takes 2–5 times longer than the shoot itself. That’s not a loss of efficiency; it’s a change in the measure of efficiency. You sell not quantity, but depth. And your game gets better and better.
And now — the exit from the robotic state. A method that returns your attention, your vision, and your right to be called a photographer.


Original | Example ( 1, 2, 3, 4, 5, 6 ) | Final
📌 How I Work: A Method Without Crutches
My Kit
Camera on a Tripod
I don’t fight the interior and I don’t use decade-old technology. My working kit: a camera on a tripod and a small speedlight with a standard 60-centimeter octabox that I hold directly in my hand.
Speedlight With a 60 cm Octabox in Hand
No extra stands, no light tripods, no attachments the size of a chandelier.
Minimal Stands — for Special Cases, 2 Lights
To be completely honest, I do bring 2 light sources and 2 stands to some properties, but that’s strictly for special creative cases.
Light Strictly Around the Camera
Octabox Behind the Camera, Centered on the Lens Axis
The light comes strictly from around the camera. When I need to pop the flash, I hold the octabox right behind the camera, aligning its center with the lens axis.
Shadows Hide Behind Objects
With this light placement, all hard shadows hide precisely behind the objects. The camera physically doesn’t see them.
Independent of Ceiling Color and Texture
I absolutely don’t care what kind of ceiling the room has — black, matte, or Grilyato grid. I don’t use it for bounce.
Layered Depth Rendering
2–3 Frames at Different Flash Power Levels, Handheld
If the room is deep, I shoot two or three frames, adjusting the flash power directly from my hand in seconds. If the room is very deep, I may even take off the softbox and fire the flash directly from the lens. The background is so far away that this becomes a good move.
Low power for the foreground; full power to punch through the darkness in the depth. No running around corners or hiding behind doorframes.
Flash Only for Color — I Layer the File in Color Blend Mode
White Spectrum Washes Away Parasitic Bounce Reflections
I don’t use the flash’s brightness to flood the room with flat light. In Photoshop, I layer the flash frame in Color blend mode. The software takes only the perfect white spectrum from the flash and washes away the dirty spots of parasitic color reflections. And it’s far from always necessary — only in the hardest cases of deep spaces and shooting against huge windows.
Volume, Texture, and Atmosphere Come From the Base Shot
All of the dimensional light and shadow, texture, and atmosphere comes from the base ambient light frame. My method preserves the honest, living light of the space while cleaning it of grime. And I address deep noise and localized dark spots selectively.
Professional Alternatives in Post
Saturation and luminance masks desaturate grimy color casts with precision. Local curves shift parasitic color in a targeted zone. A high-CRI LED wand illuminates only where volume has collapsed, without flooding the room with flat light. There are many tools. Flash into the ceiling is the crudest of them.

Final | Example ( 1, 2, 3, 4, 5, 6 ) | Original
📌 How to Get Off the Flambient Needle: Four Steps
Acknowledging the Method’s Merits
Nathan Cool Is a Genius of His Time
If you’re deeply hooked on Cool’s method, don’t cover your head in ashes. Let’s be honest: Nathan Cool is a genius of his era. He created a great industry standard that helped thousands of photographers worldwide survive, earn their bread, and not lose their minds during the dawn of digital interior photography. It was a cool, technological breakthrough.
An Industry Standard That Saved Thousands of Photographers
Those who masterfully wield Flambient today are people with colossal perseverance, iron discipline, and a great understanding of Photoshop geometry.
The Foundation: Perseverance, Discipline, Photoshop Geometry
You already know how to work with your hands, and that’s an excellent foundation.
Step 1. Accept Reality
Cool’s Method Is a Crutch
Cool’s method is a crutch. Stop justifying a flat image with «market demands.»
Run Several Shoots in Parallel
Try conducting several shoots in parallel: the way you’re used to, and without multi-strobe frames.
Step 2. Lock the Trigger in a Cabinet for Three Shoots
Ambient Only: Natural Light Exclusively
Do your next several shoots Ambient Only — only with natural light.
Relearn to See Space
Your main task is to relearn how to see space.
Light From the Window, Shadow From the Armchair, Twilight in the Corner
Understand how light enters through the window, how the shadow of an armchair falls, how the deep twilight in the corner holds the frame’s balance.
Reclaim the Resource of Attention
Reclaim your attention resource. Start playing chess with light instead of annihilating it.
Step 3. Introduce Tactical Realism
Turn On a Floor Lamp Instead of a Ceiling Flash
If the property has flat gray light, don’t flood it with a ceiling flash. Turn on a floor lamp.
Swap Toxic Bulbs — Always Carry a High-CRI Set
Change the toxic bulbs in sconces. Always carry a set of good, high-CRI bulbs with you.
Tight and Medium Shots With Shadow Geometry
Start shifting to tight and medium shots where shadow geometry works, not the volume of the whole room.
Step 4. Bring Back the Flash — But Layer It in Color Mode
Work According to the «How I Work» Section
When you’re ready to pick up a light again, forget about the ceiling. Work as described in the «How I Work: A Method Without Crutches» section: octabox on the lens axis, flash strictly in Color mode, and the light-shadow drawing coming from the ambient frame. If you have questions about creating luminosity masks, here’s the material: «Light Surgery.»
The Result: 4 Thoughtful Frames Instead of 15 Fussy Layers
You’ll see how a shoot shrinks from 15 fussy layers to 4 thoughtful frames, and processing takes less time because you’ll stop fighting torn grime in Darken mode. You’ll start selling not machinery, but beauty and meaning.
📌 Gear: Why Not Ring Flashes
Power Arithmetic: Numbers, Not Opinions
Base Combo: V860 III + 60 cm Octabox — Guide Number 19
Base combo: Godox V860 III + 60 cm octabox. Guide number at wide angle is about 32. Softbox light loss is minus 1.5 stops. Effective GN is roughly 19. Remember this number.
Ring Attachment on V860: GN Drops to 8–12 — Loss of 2–3 Stops
Macro ring attachment on a V860 III: light passes through a plastic labyrinth of mirrors and diffusers. Losses: 2–3 stops. Effective GN drops to 8–12. You pay $30 to turn a powerful speedlight into a weak one with torn reflections. Not an option.
Godox ML-150 II: GN 14 — Not Enough
Rated GN: 14. That’s 2.5 stops weaker than a V860 III in an octabox. Six times less light output. This is a macro flash, far from interior photography.
Godox AR400: GN 26 in Octabox — Power Is There, But At What Cost
Rated GN: 45. A powerful ring flash. Technically, you can mount a softbox on it. But there’s a nuance: the ring weight is 800 g, plus a 400 g octabox. Total: 1.2 kg on an outstretched arm. A 1.2 kg battery pack on your belt and a cable between it and the ring. Effective GN in an octabox is about 26. That’s +0.7 EV over the V860 III — less than a stop gained at the cost of double the weight, a cable, and $400.
Real-World Reach Distance
Full Frame, f/8, 5-Meter Room
Scenario: Full Frame, f/8, 5-meter room.
V860 III Handles It at ISO 400
V860 III + 60 cm octabox: effective GN ~19. Distance for f/8, ISO 100 is 2.4 m. Doesn’t reach 5 meters. Need ISO 400 — reaches.
AR400 Handles It at ISO 200
AR400 + 60 cm octabox: effective GN ~26. Distance for f/8, ISO 100 is 3.25 m. Need ISO 200 — reaches.
Everything Else Won’t Reach Even at High ISO
Ring attachment on V860 III: effective GN ~10, distance 1.25 m — won’t reach even at ISO 1600. ML-150 II: effective GN 14, distance 1.75 m — won’t reach at all.
Reality Across Camera Formats
Micro 4/3: V860 III With Headroom, ML-150 II at Its Limit
Micro 4/3, f/5.6, ISO 200: V860 III + octabox — 1/4–1/2 power, headroom exists. ML-150 II — 1/1 power + ISO 800, noise.
APS-C: V860 III Works, ML-150 II Doesn’t Cut It
APS-C, f/7.1, ISO 200: V860 III — 1/2–1/1, works. ML-150 II — insufficient.
Full Frame: V860 III at ISO 400, AR400 Comfortable at f/8
Full Frame, f/8, ISO 400: V860 III — 1/1, works. AR400 + octabox — 1/2, comfortable. Full Frame, f/11, ISO 800: V860 III — 1/1 + ISO 800. AR400 — 1/1 + ISO 400, works.
The Glare Problem: Why the Ring Loses to the Octabox
60 cm Octabox — a Soft Square Covering a Third of a Square Meter
In terms of pure color cleanup, a ring flash and an octabox behind the camera solve the same task. Both provide a white spectrum along the lens axis. If the surface is matte and flat, there’s no difference. The difference appears on real surfaces. The 60 cm octabox is a light source with an area of a third of a square meter. Its reflection is a huge, soft square with blurred edges.
Ring Flash — a Thin Source, 2–3 Centimeters Wide
A ring flash is a thin source. The width of the light-emitting part is 2–3 centimeters. On a perfectly flat surface, the reflection falls as an even ring. But when a panel seam, chamfer, or slight waviness appears in Color mode, a narrow zone emerges where the color transition becomes sharp. The eye perceives this as a color stripe.
On a Perfectly Flat Surface, No Difference
On a perfectly flat surface, the reflection falls as an even ring, and the recolor in Color mode is quite uniform.
On Gloss, Chamfers, and Panel Seams — Risk of a Color Stripe
When a panel seam, chamfer, or slight waviness appears, a narrow zone emerges in Color mode where the color transition becomes sharp. You could shoot an entire property with a ring flash and find zero artifacts. Or you could stumble onto a stripe on a glossy cabinet front when a reshoot is impossible.
The Octabox Forgives Irregularities; the Ring Does Not
I work with diverse interiors where gloss, glass, and complex geometry are the norm. That’s why I pay for this reliability with a free hand and a few hundred grams of weight.
Budget: What Costs What and What Never to Buy
Ring Attachment for $30 — Light Ruiner, Not an Option
Macro ring attachment for V860 III: ~$30. GN 8–12. Torn ring. Light ruiner.
Yongnuo YN-14EX for $110 — Not Enough Power
Yongnuo YN-14EX: ~$110. GN 14. Hard ring. Not enough power.
Godox ML-150 II for $140 — Macro Flash, Not for Interiors
Godox ML-150 II: ~$140. GN 14. Hard ring. Not enough power.
Godox AR400 for $400 — Power Is There, But 1.2 kg on the Wrist, Cable, Belt Pack
Godox AR400 + octabox: ~$400. Eff. GN ~26. Hard ring. 1.2 kg on the wrist, cable, battery pack on the belt. Power exists; ergonomics don’t.
Why the Market Doesn’t Make a Ring Flash for Interiors
Rings Were Created for Macro — Completely Different Distances
A ring flash was created for macro and works well there. It needs to illuminate a subject at close distances. At such a distance, even GN 14 is enough for f/32.
The Interior Task: Reach 5 Meters at f/8 — That’s Different Physics
An interior photographer needs to reach 5 meters at f/8. That’s different physics. The market doesn’t produce a ring flash for this task.
Making a Ring Both Powerful and Soft Simultaneously Is Expensive and Physically Impossible
Making a ring soft is physically impossible — a large doughnut would block the lens’s view. Making a ring simultaneously powerful and portable is expensive, niche, and still doesn’t solve the glare problem.
📌 Gear: Godox AD100–AD600 and the Final Verdict
AD100 Pro — a Sideways Step Without Advantage
+0.2 EV Over V860 III — Margin of Error, Imperceptible
The AD100 Pro is a portable 100 W·s monolight. Power: 100 W·s vs. 76 for the V860 III. Real GN: 34 vs. 32. GN in octabox: 20 vs. 19. Difference: +0.2 EV. Margin of error.
Heavier, Less Comfortable in Hand, More Expensive
The AD100 is heavier, less comfortable to handhold, and costs more.
Not Interior Photography Equipment
The AD100 Pro is not interior photography equipment.
AD200 Pro II With Bare Bulb — an Honest Plus One Stop
+1 EV Over V860 III — Full Frame f/8 at ISO 200 Instead of 400
AD200 with bare bulb: +1 EV over V860 III. Full Frame, f/8, 5 meters — ISO 200 instead of 400. Cleaner frame and faster recycle.
The Bare Bulb Fills the Octabox Completely; the V860’s Directed Beam Cannot
The bare bulb fires 360° and fills the softbox entirely — while the V860 only has a directed beam. That’s where the gain comes from.
Compromises: Fragile Bulb, Spare Needed, Softbox Only, More Expensive
The bare bulb is fragile — caution and a spare in the case are required. More expensive. And it’s a highly specialized tool — there’s no hotshoe foot, so you can’t repurpose it for other scenarios.
Justified for Whom: Large Dark Spaces, f/8–11, Low ISO Is Critical
The AD200 is justified if you regularly shoot large, dark spaces at f/8–11 and an extra stop of clean light is critical for you.
AD400 Pro and AD600 Pro — Not for Handholding Behind the Camera
Weight 2.1 kg and 3.0 kg — Stand and Assistant Only
AD400 Pro: 2.1 kg. AD600 Pro: 3.0 kg. Holding them by hand behind the camera is impossible. Only a stand and an assistant.
This Is a Transition to Another League, a Different Shooting Philosophy
These are studio units. They solve the power task with generous overhead, but for the «camera on tripod, flash in hand behind camera» method, they don’t exist.
Final Verdict
Daily Workhorse
Godox V860 III + Bowens S-bracket + 60 cm octabox. Kit price: ~$255. Full Frame, f/8, 5-meter room — ISO 400. Sufficient power for 90% of jobs. Comfortable assembled weight, fits in a backpack. Unclip from the bracket, and it works as a regular on-camera speedlight.
Reserve for a Complex Property
AD200 Pro II with bare bulb in the same bracket and softbox. Kit price: ~$425. +1 EV over V860 III — cleaner frame, faster recycle, headroom for tough conditions.
When You Don’t Need the AD200
Two V860 III units on two light stands, radio-synchronized — that gives you an honest +1 EV. Cheaper than a single AD200. Each flash remains light and universal.
What Never to Buy
- Macro ring attachments for on-camera speedlights
- Ring flashes ML-150 II, YN-14EX, and similar — insufficient power
- AR400 with softbox — power exists, but weight, cable, battery pack, and hard reflections kill it
- AD200 with H200 round head — no more powerful than a V860 III in a 60 cm octabox
- AD100 Pro — a sideways step with no real advantage
- AD400 and AD600 — not for handholding behind the camera
📌 Conclusion: The Photographer Sings an Ode to the Space, Changing Methods and Inventing Their Own New Games
A professional plays from the reality that the management dictates. A craftsman hides from reality behind machinery. Cool’s method was a reasonable compromise for its time, but today it is a crutch. It robs the photographer of attention, texture, color, and air. It capitulates in the face of complex light instead of outplaying it.
The photographer must sing an ode to the space. Not an ode to the method. The robot-puller will soon be replaced by an iPhone. Time is tightening, but it’s worth growing — or you’ll have to leave this garden bed.
If a photographer only has one method, they are no longer a photographer. They are a robot-puller with a button and a flash.